
This original blog post was featured on Bernina's We All Sew Blog. I hope it makes machine applique easy and quick and makes you want to do more!
Hello, I’m Jill From Jillily Studio. I love to applique! And I love my BERNINA
machines! When I choose to applique by
machine, my BERNINA makes it a breeze.
Here’s how I do it:

1.
I prepared all of my
applique pieces by turning the seam allowance - and the raw edges - to the
wrong side of the shape. (To see how I prep pieces, you can visit
www.jillilystudio.com)

2.
Put a dot of Appli-Glue every ½” to 1” to hold
your appliqué down while you sew. This
is important so that your pieces don’t shift as you are moving them under your
needle.

2b. Notice how flags of extra fabric stick out at
the points of the applique pieces? When
I am hand stitching, I tuck those under as I stitch, but to machine stitch,
those need to be tucked under before going to your machine.

3.
Use a tailor’s awl to
turn the flags under.

4.
Place a dot of Appli-Glue
under the corner to keep the flag in place.

5.
Now the flower petals
are all turned under and it’s ready to be sewn.

6.
I'm using clear, monofilament
thread on top. Since this thread is straight wound on the spool, I have it
sitting on my upright spool pin.
NOTE: If the thread spool was
cross-wound, I would want it to be on my horizontal spool pin.

7.
I'm using Aurifil 50
weight cotton thread in my bobbin.
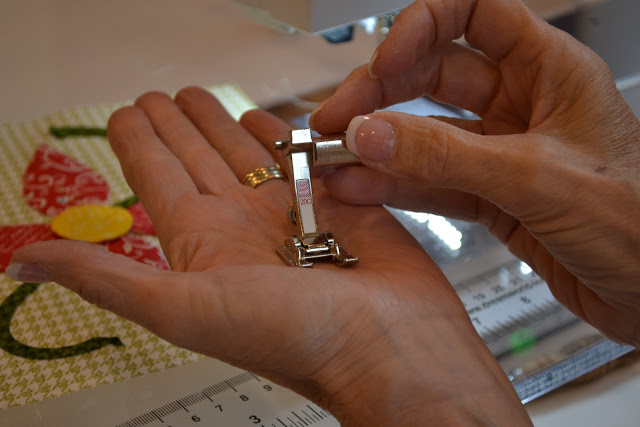
8.
I use the 20C Bernina foot—because
it is open enough for me to see where the needle is going. Any open toed foot will work.

9.
I choose the zig-zag
stitch on my machine.

10.
Change width to .7 and
length to 1.10.

11.
I click in the top
right corner to change my machine's tension because I'm using two different
kinds of thread, and nylon thread tends to stretch a lot.

12.
Change the tension to
2.25. This varies from machine to machine. On my older model Bernina, I would change
the tension to almost 0.

13.
Position
your block so the needle zigs into the appliqué piece, then zags into the
background right next to the edge of the applique shape.

14.
When I get to the
corner, I make sure to keep my needle down (I use the ‘needle-down’ setting) in
the corner of the applique shape and turn the block to go down the other
side. I have set my machine to “hover”,
so that I do not have to lift my presser foot every time I want to turn or adjust
a little. This feature is great! I just sew along, and when I pause, my
presser foot lifts a tiny bit, (hovers) –just enough to take the pressure off the
material under the foot so that I can move it.
Then I just start sewing again—I don’t have to lower the presser
foot.

15.
Repeat around all of
the individual appliqué pieces.

16.
The finished product—doesn’t
it look great?

17.
When it’s all stitched down, you can
really only see the stitching from the back.
This is a quick way to get look of hand-stitched applique with no raw
edges in a fraction of the time!
Enjoy!
2 comments:
Ok. Here is a probably dumb question. Why do you put the monoment filament thread on the vertical spindle as opposed to the horizontal spindal. I know you said it was straight wound, but I am wondering why?
Maybe that is why I have never been very successful with it, because I use itmon the horizontal spindle.
Some great information. It's always good to have little refresher lessons.
In stitches
Annette
Post a Comment